Overview
This article describes how you can configure Windows Server 2008 as a RADIUS Server and integrate it with Cyberoam.
Scenario
Configure Windows Server 2008 as RADIUS Server with MS-CHAP v2 authentication and integrate Cyberoam as a RADIUS Client.
ConfigurationYou can configure Windows Server 2008 by following the steps given below. Configuration is to be done from Windows Server Manager. Note:
Prior to configuration, make sure that:
- You have setup Active Directory Services, and Network Policies and Access Services (NPS) Roles.
- The NPS Roles are integrated with the Active Directory.
Step 1: Add Cyberoam as RADIUS Client
· Login to Windows Server 2008 using Administrator profile.
· Go to Start à Administrative Tools à Server Manager .
· On the left panel, expand Roles à Network Policy and Access Services à NPS (Local) à RADIUS Clients and Servers and right click onRADIUS Clients. Click New RADIUS Client to create a new client according to parameters given below.

Parameter Description

Click OK to create the RADIUS Client.

Step 2: Configure Network Policies
On the left panel, expand Roles à Network Policy and Access Services à NPS (Local)à Policies and right-click Network Policies. Click Newto open the New Network Policy Wizard.

· Mention Policy Name and click Next.

· Click Add under Specify Conditions to add conditions that determine whether this network policy is evaluated for a connection request. Here, we have added 2 conditions:
- User Group as Marketing
- NAS IP address as Cyberoam LAN IP address

· The Select Condition Window opens. Select the first type of condition as User Groups and click Add.

· The User Groups Window opens. Click Add Groups... to add user groups.

· The Select Group Window opens. Mention the Group Marketing under Enter the object name to select and click OK.
 
· The user group condition is added. Now click Add... again to add the second condition.

· Under Gateway section, select NAS IPv4 Address to specify the IP address of the Network Access Server (NAS) and click Add.

· Mention Cyberoam’s LAN IP address as NAS address.

· Click OK to save settings. The following screen is displayed showing configured conditions. Click Next.

· The Specify Access Permission screen appears. Select Access granted and click Next.

· The Configure Authentication Methods screen appears. Select the authentication as Microsoft Encrypted Authentication version 2 (MS-CHAP v2) and Unencrypted authentication (PAP, SPAP). Click Next.
PAP authentication method is required because Cyberoam uses PAP to test connectivity with the RADIUS Server.

· The Configure Constraints screen appears. Retain default constraints. Click Next.

· The Configure Settings screen appears. Retain default settings. Click Next.
If you want to configure Tight Integration between RADIUS Server and NAS, then add Filter ID as one of the attributes by clicking Add....

· The Completing New Network Policy appears which displays the summary of the policy you have configured. Click Finish to create the policy.
 Step 3: Allow Network Access to Users
Once Network Policies are configured, ensure that users, belonging to the User Group defined in the Policy, are allowed network access. Here, we have enabled network
access of a user named John Smith who belongs to the CYBEROAM"Marketing User Group. You can enable network access by following instructions given below.
to display a list of existing users. Right click user John Smith and click Properties from the pop up.

In the Properties window, switch to Dial-in tab, under Network Access Permission select Allow access to allow network access to user John Smith.

Click OK to save settings.
Step 4: Integrate Cyberoam with RADIUS Server
Integrate Cyberoam with the RADIUS Server configured above such that it uses the Server for user authentication. To know how you can configure Cyberoam
to use RADIUS Server, refer to the article Configure Cyberoam to use RADIUS Server for Authentication.
The above configuration configures the Windows Server 2008 as a RADIUS Server with Cyberoam as the Client. Cyberoam uses this RADIUS Server for user authentication.
|
Thursday, June 5, 2014
Configure Windows Server 2008 as a RADIUS Server with MS-CHAP v2 Authentication

Monday, April 21, 2014
Install Nagios on RHEL/CentOS 6.x/5.x and Fedora 19/18/17
Nagios is an awesome Open Source monitoring tool, its provides you more comprehensive monitoring environment to always keep an eye on your all machines / networks whether you are in a your data center or just your small labs.
With Nagios, you can monitor your remote hosts and their services remotely on a single window. It shows warnings and indicates if something goes wrong in your servers which eventually helps us to detect some problems before they occur. It helps us to reducedowntime and business losses.
Recently, Nagios released its latest versions Nagios 4.0.1 on 15th October 2013, and its latest stable release of Nagios plugins 1.5.
This article is intended to guide you with easy instructions on how to install latest Nagios 4.0.1 from source (tarball) on RHEL 6.4/6.3/6.2/6.1/6/5.8, CentOS 6.4/6.3/6.2/6.1/6/5.8and Fedora 19,18,17,16,15,14,13,12 distributions. Within 30 minutes you will be monitoring your local machine, no any advanced installation procedure only basic installation that will work 100% on most of the today’s Linux servers.
Please Note: The installation instructions were shown in here are written based on CentOS 6.4 Linux distribution.
Installing Nagios 4.0.1 and Nagios Plugin 1.5
If you follow these instructions correctly, you will end up with following information.
- Nagios and its plugins will be installed under /usr/local/nagios directory.
- Nagios will be configured to monitor few services of your local machine (Disk Usage, CPU Load, Current Users, Total Processes, etc.)
- Nagios web interface will be available at http://localhost/nagios
Step 1: Install Required Dependencies
We need to install Apache, PHP and some libraries like gcc, glibc, glibc-common and GDlibraries and its development libraries before installing Nagios 4.0.1 with source. And to do so we can use yum default package installer.
[root@tecmint]# yum install -y httpd php gcc glibc glibc-common gd gd-devel make net-snmp (RedHat / CentOS)
Step 2: Create Nagios User and Group
Create a new nagios user and nagcmd group account and set a password.
[root@tecmint]# useradd nagios[root@tecmint]# groupadd nagcmd
Next, add both the nagios user and the apache user to the nagcmd group.
[root@tecmint]# usermod -G nagcmd nagios[root@tecmint]# usermod -G nagcmd apache
Step 3: Download Nagios Core 4.0.1 and Nagios Plugin 1.5
Create a directory for your Nagios installation and all its future downloads.
[root@tecmint]# mkdir /root/nagios[root@tecmint]# cd /root/nagios
Now download latest Nagios Core 4.0.1 and Nagios plugins 1.5 packages with wget command.
[root@tecmint nagios~]# wget http://prdownloads.sourceforge.net/sourceforge/nagios/nagios-4.0.1.tar.gz[root@tecmint nagios~]# wget https://www.nagios-plugins.org/download/nagios-plugins-1.5.tar.gz
Step 4: Extract Nagios Core and its Plugins
We need to extract downloaded package with tar command as follows.
[root@tecmint nagios~]# tar –xvf nagios-4.0.1.tar.gz[root@tecmint nagios~]# tar –xvf nagios-plugins-1.5.tar.gz
When you extract these tarballs with tar command, two new folders will appear in that directory.
[root@tecmint nagios ~]# lltotal 371218 root root 4096 Oct 17 03:28 nagios-4.0.1drwxrwxr-xrw-r--r-- 1 root root 1695367 Oct 15 19:49 nagios-4.0.1.tar.gz-drwxr-xr-x 15 200 300 4096 Oct 14 10:18 nagios-plugins-1.5-rw-r--r-- 1 root root 2428258 Oct 2 11:27 nagios-plugins-1.5.tar.gz
Configure Nagios Core
Now, first we will configure Nagios Core and to do so we need to go to Nagios directory and run configure file and if everything goes fine, it will show the output in the end as sample output. Please see below.
[root@tecmint nagios~]# cd nagios-4.0.1[root@tecmint nagios-4.0.1 ]# ./configure --with-command-group=nagcmd
Sample output:
Nagios executable: nagiosNagios user/group: nagios,nagiosCommand user/group: nagios,nagcmdstall ${prefix}: /usr/local/naEvent Broker: yes I ngios Install ${includedir}: /usr/local/nagios/include/nagioslt directory: ${prefix}/var/spool/checkresultsLock file: ${prefix}/var/nagios.lock Check res u Init directory: /etc/rc.d/init.d Apache conf.d directory: /etc/httpd/conf.dface Options: ----------------------Mail program: /bin/mail Host OS: linux-gnu Web Inte r-- HTML URL: http://localhost/nagios/ CGI URL: http://localhost/nagios/cgi-bin/' to compile the main program and CGIs.Traceroute (used by WAP): /bin/traceroute Review the options above for accuracy. If they look okay, type 'make all
Now, after configuring we need to Compile and install all the binaries with make command and make install command will install all the needed libraries in your machine and we can proceed further.
[root@tecmint nagios-4.0.1 ]# make all[root@tecmint nagios-4.0.1 ]# make install
Sample output:
*** Main program, CGIs and HTML files installed ***ou can continue with installing Nagios as follows (type 'make'Ywithout any arguments for a list of all possible options):etc/rc.d/init.dmake install-init - This installs the init script in /make install-commandmode - This installs and configures permissions on the- This installs sample config files in /usr/local/nadirectory for holding the external command file make install-configgios/etc
Following command will install the init scripts for Nagios.
[root@tecmint nagios-4.0.1 ]# make install-init
To make nagios work from command line we need to install command-mode.
[root@tecmint nagios-4.0.1 ]# make install-commandmode
Next, install sample nagios files, please run following command.
[root@tecmint nagios-4.0.1 ]# make install-config
Sample output:
/usr/bin/install -c -m 775 -o nagios -g nagios -d /usr/local/nagios/etc/usr/bin/install -c -m 775 -o nagios -g nagios -d /usr/local/nagios/etc/objects/usr/bin/install -c -b -m 664 -o nagios -g nagios sample-config/nagios.cfg /usr/local/nagios/etc/nagios.cfg/usr/bin/install -c -b -m 664 -o nagios -g nagios sample-config/cgi.cfg /usr/local/nagios/etc/cgi.cfgource.cfg /usr/bin/install -c -b -m 664 -o nagios -g nagios sample-config/template-object/templates.cfg /usr/lo/usr/bin/install -c -b -m 660 -o nagios -g nagios sample-config/resource.cfg /usr/local/nagios/etc/re scal/nagios/etc/objects/templates.cfg /usr/bin/install -c -b -m 664 -o nagios -g nagios sample-config/template-object/commands.cfg /usr/local/nagios/etc/objects/commands.cfgs -g nagios sample-config/template-object/timeperiods.cfg /usr/local/nagios/etc/objects/timeperiods.cfg /usr/bin/install -c -b -m 664 -/usr/bin/install -c -b -m 664 -o nagios -g nagios sample-config/template-object/contacts.cfg /usr/local/nagios/etc/objects/contacts.cfg /usr/bin/install -c -b -m 664 -o nagi oo nagios -g nagios sample-config/template-object/localhost.cfg /usr/local/nagios/etc/objects/localhost.cfg /usr/bin/install -c -b -m 664 -o nagios -g nagios sample-config/template-object/windows.cfg /usr/local/nagios/etc/objects/windows.cfg/etc/objects/switch.cfg *** Config files installed *** Remember, these are *SAMPLE* config files. You'll need to read the document/usr/bin/install -c -b -m 664 -o nagios -g nagios sample-config/template-object/printer.cfg /usr/local/nagios/etc/objects/printer.cfg /usr/bin/install -c -b -m 664 -o nagios -g nagios sample-config/template-object/switch.cfg /usr/local/nagio sation for more information on how to actually defineservices, hosts, etc. to fit your particular needs.
Step 5: Customizing Nagios Configuration
Open the “contacts.cfg” file with your choice of editor and set the email addressassociated with the nagiosadmin contact definition to receiving email alerts.
# vi /usr/local/nagios/etc/objects/contacts.cfg
Sample Output
################################################################################################################################################################ # CONTACTS # ################################################################ ############################################################################## # Just one co############## #ntact defined by default - the Nagios admin (that's you)from the 'generic-contact' # template which is defined elsewhere. define contact{# This contact definition inherits a lot of default value s contact_name nagiosadmin ; Short name of userues from generic-contact template (defined above) alias Nagios Admin ; Full name of useruse generic-contact ; Inherit default va lemail tecmint@tecmint.com ; *** CHANGE THIS TO YOUR EMAIL ADDRESS ****}
Step 6: Install and Configure Web Interface for Nagios
We are done with all configuration in the backend, now we will configure Web Interface For Nagios with following command. The below command will Configure Web interface for Nagios and a web admin user will be created “nagiosadmin”.
[root@tecmint nagios-4.0.1 ]# make install-webconf
In this step, we will be creating a password for “nagiosadmin”. After executing this command, please provide a password twice and keep it remember because this password will be used when you login in the Nagios Web interface.
[root@tecmint nagios-4.0.1]# htpasswd -s -c /usr/local/nagios/etc/htpasswd.users nagiosadminNew password: Re-type new password:Adding password for user nagiosadmi n
Restart Apache to make the new settings take effect.
[root@tecmint ]# service httpd start (On RedHat / CentOS)[root@tecmint ]# systemctl start httpd.service (On Fedora)
Step 7: Compile and Install Nagios Plugin
We have downloaded nagios plugins in /root/nagios, Go there and configure and install it as directed below.
[root@tecmint nagios]# cd /root/nagios[root@tecmint nagios]# cd nagios-plugins-1.5[root@tecmint nagios]# ./configure --with-nagios-user=nagios --with-nagios-group=nagios[root@tecmint nagios]# makeinstall[root@tecmint nagios]# make
Step 8: Verify Nagios Configuration Files
Now we are all done with Nagios configuration and its time to verify it and to do so please insert following command. If everything goes smooth it will show up similar to below output.
[root@tecmint nagios]# /usr/local/nagios/bin/nagios -v /usr/local/nagios/etc/nagios.cfg
Sample Output
/usr/bin/install -c -m 644 sample-config/httpd.conf /etc/httpd/conf.d/nagios.conf*** Nagios/Apache conf file installed ***nagios/etc/nagios.cfg ... ... Total Warnings: 0 Total Errors: 0/usr/local/nagios/bin/nagios -v /usr/local/
Step 9: Add Nagios Services to System Startup
To make Nagios work across reboots, we need to add nagios and httpd with chkconfigcommand.
[root@tecmint ]# chkconfig --add nagios[root@tecmint ]# chkconfig --level 35 nagios on[root@tecmint ]# chkconfig --add httpdttpd on[root@tecmint ]# chkconfig --level 35 h
Restart Nagios to make the new settings take effect.
[root@tecmint ]# service nagios start (On RedHat / CentOS)[root@tecmint ]# systemctl start nagios.service (On Fedora)
Step 10: Login to the Nagios Web Interface
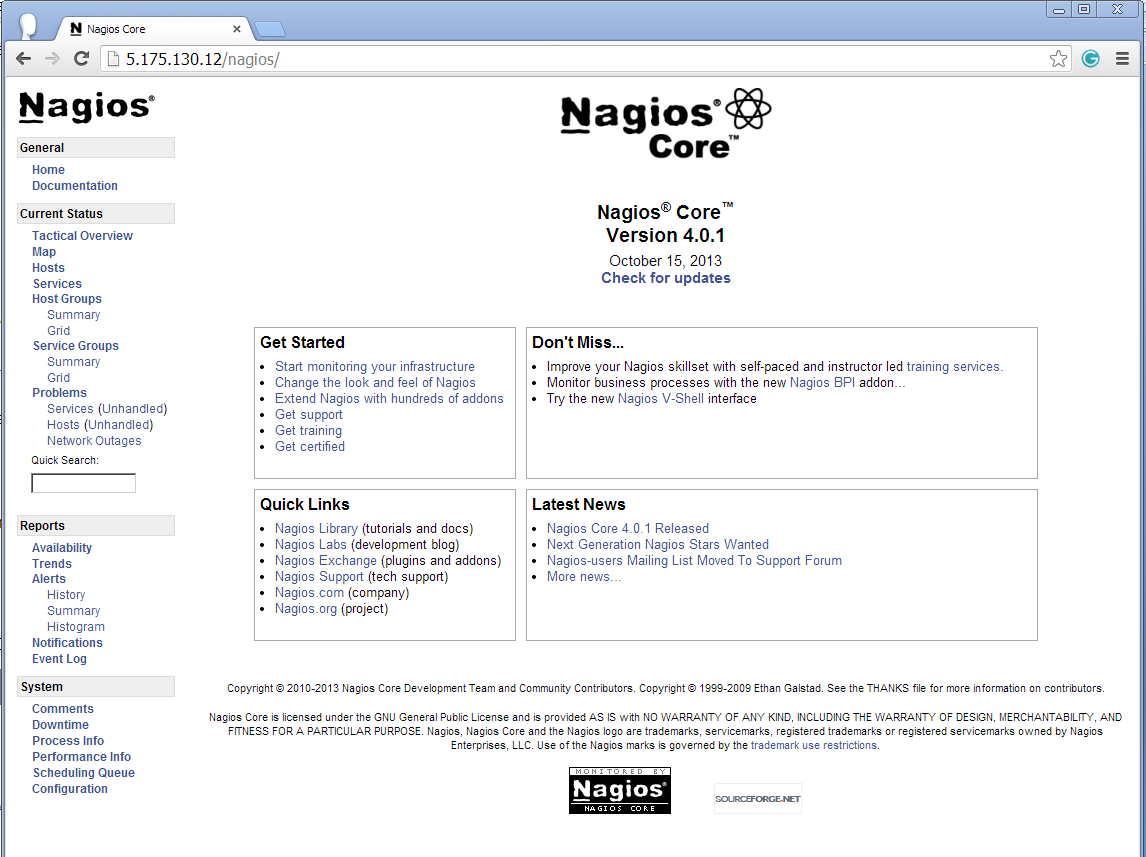
Your nagios is ready to work, please open it in your browser with “http://Your-server-IP-address/nagios” or “http://FQDN/nagios” and Provide the username “nagiosadmin” andpassword.
Nagios Login
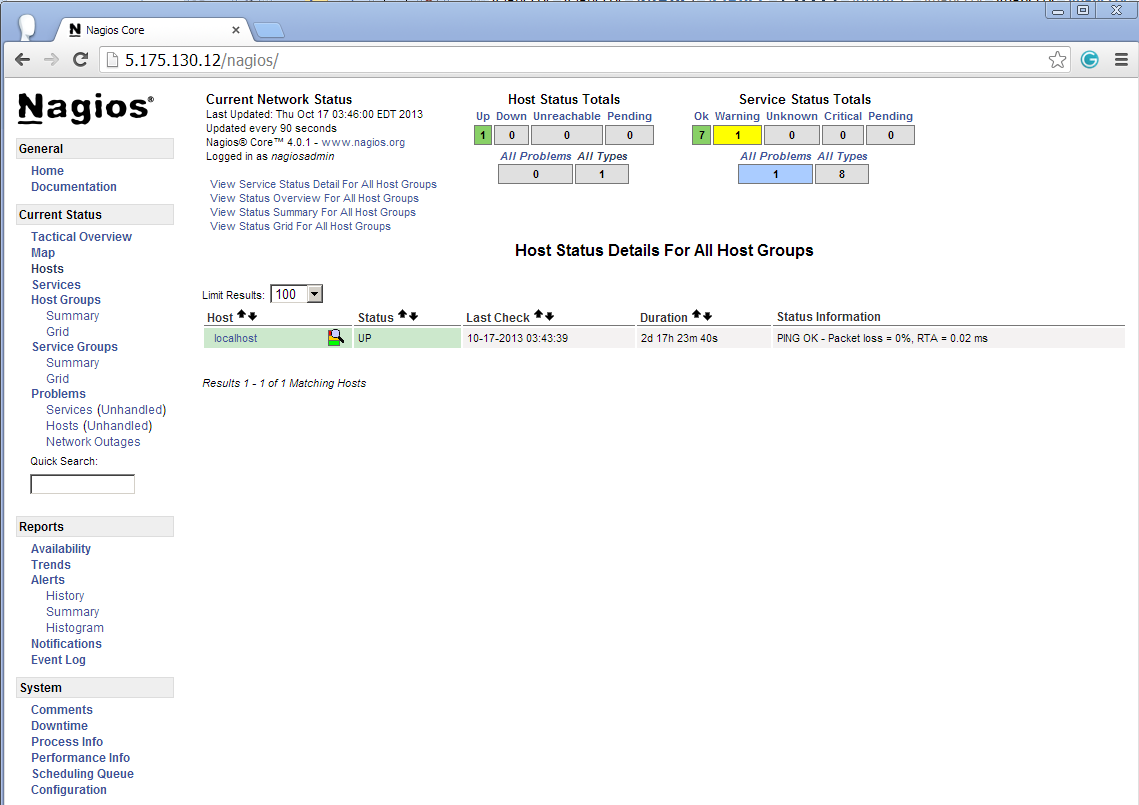
Host View
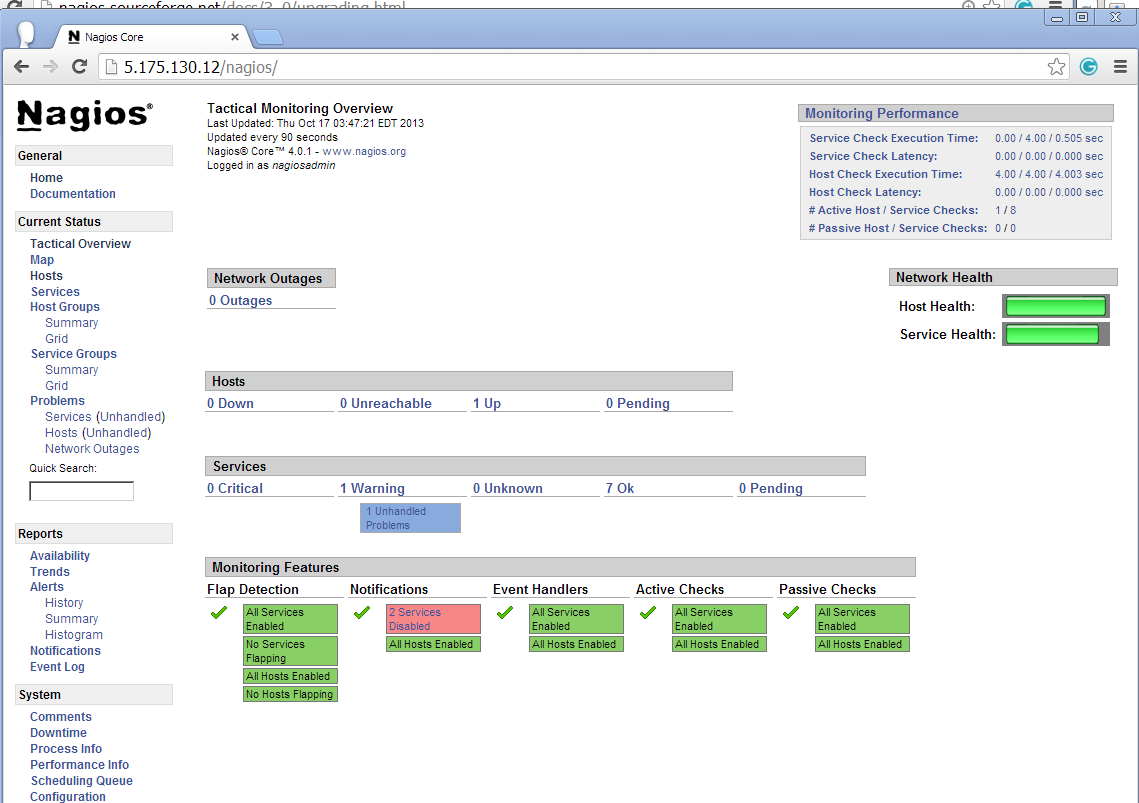
Nagios Overview
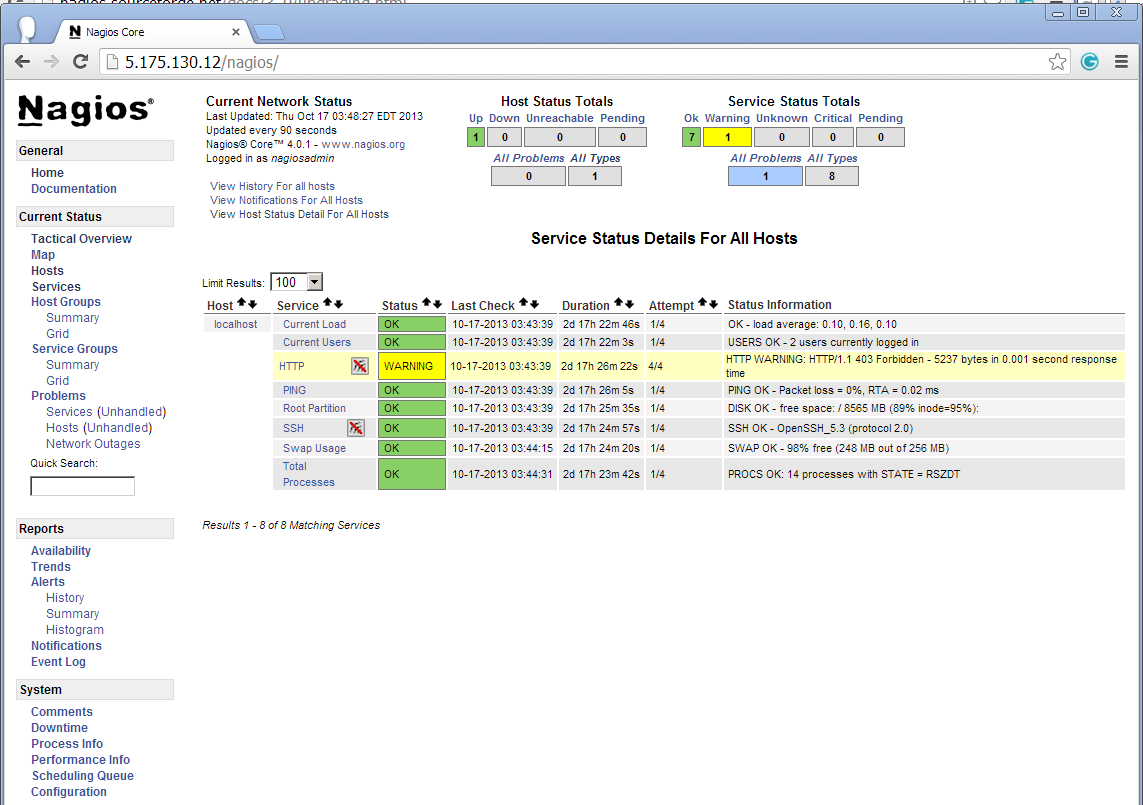
Service View
Process View
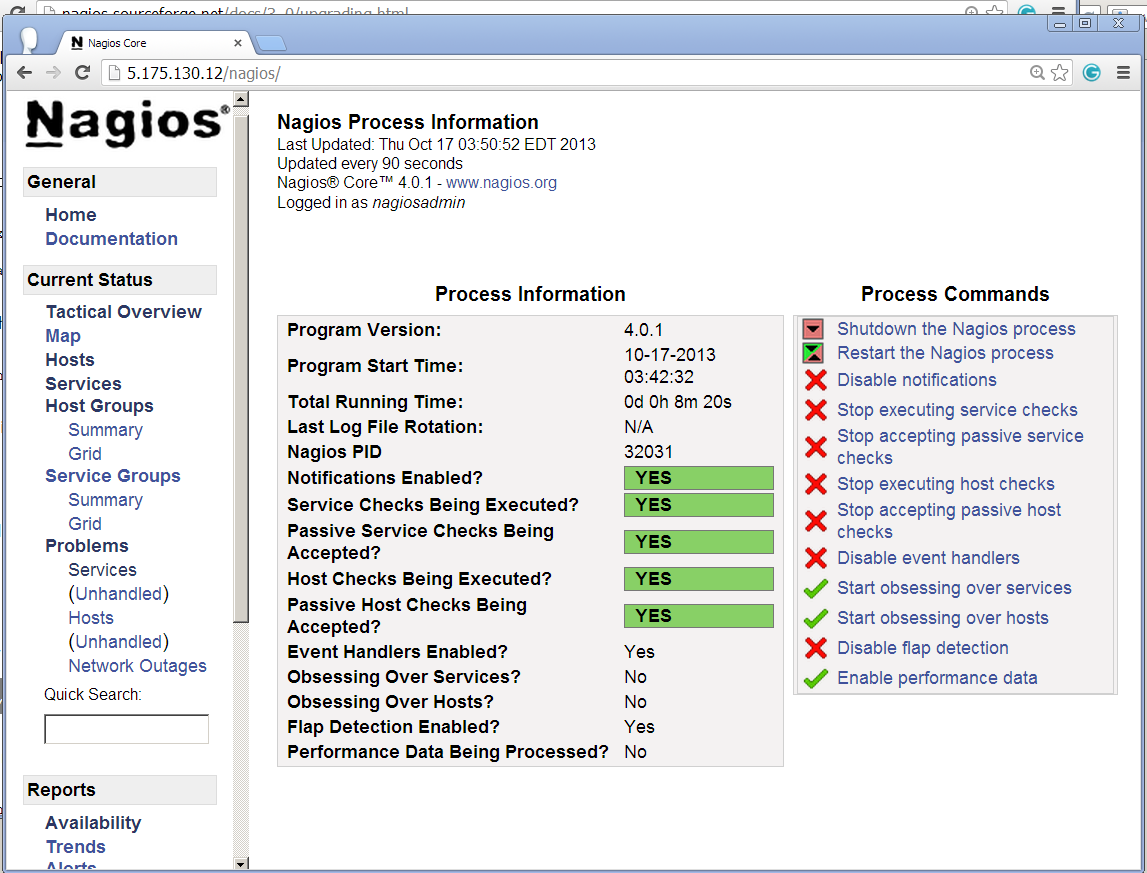
Congratulations! You’ve successfully installed and configured Nagios and its Plugins. You’ve just begin your journey into monitoring.
Upgrade Nagios 3.x to Nagios 4.0.1
If you are already running an older version of Nagios, you can upgrade it anytime. To do so, you just need to download the latest tar archive of it and configure it as shown below.
[root@tecmint ]# service nagios stop[root@tecmint ]# tar –zxvf nagios-4.0.1.tar.gz[root@tecmint ]# cd nagios-4.0.1t@tecmint ]# make all [root@[root@tecmint ]# ./configure [ro otecmint ]# make installnagios start[root@tecmint ]# service
That’s it for now, in my upcoming articles, I will show you how to add Linux, Windows,Printers, Switches and Devices to Nagios monitoring Server. If you’re having any trouble while installing, please do contact us via comments. Till then stay tuned and connected toTecmint and don’t forget to Like and Share us to spread around.
http://www.tecmint.com/install-nagios-in-linux/
Monday, April 7, 2014
7 lý do bạn nên đi bộ ngoài trời
Chúng ta dành rất nhiều thời gian trong văn phòng ngồi trước máy tính, mà quên rằng có rất nhiều điều tuyệt vời ở bên ngoài.
Monday, March 17, 2014
VPN PPP/GRE behind firewall Checkpoint
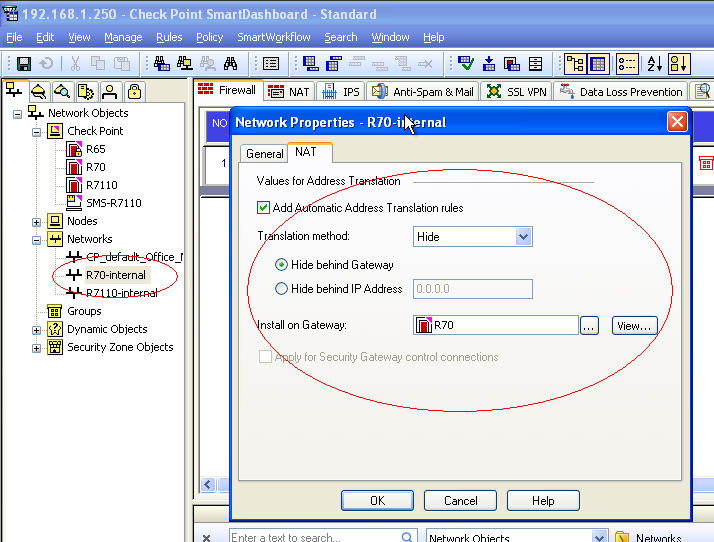
1. In the properties of PPTP Client/PPTP Network object check the box 'Add Automatic Address Translation rules' - choose desired NAT method ('Hide behind Gateway' or 'Hide behind IP Address').
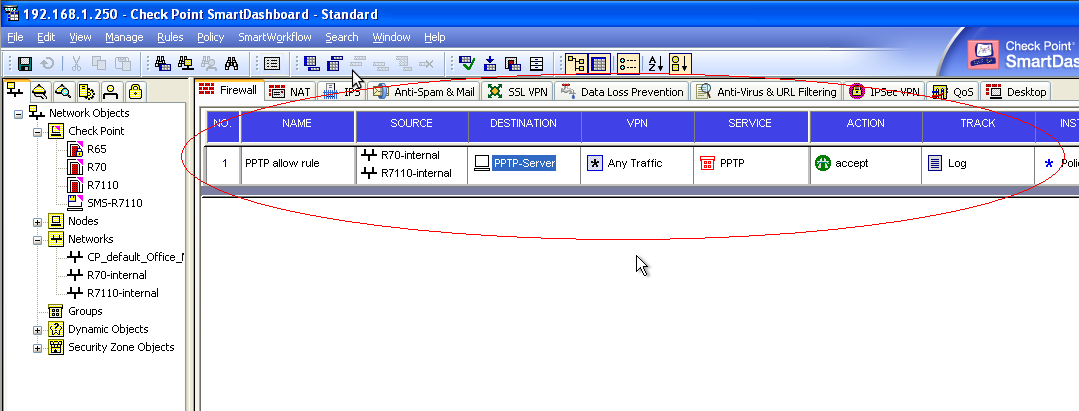
2. Create a Security Rule to allow the PPTP service.
3. In 'General Properties' of Security Gateway check the box 'IPS' to activate this blade.
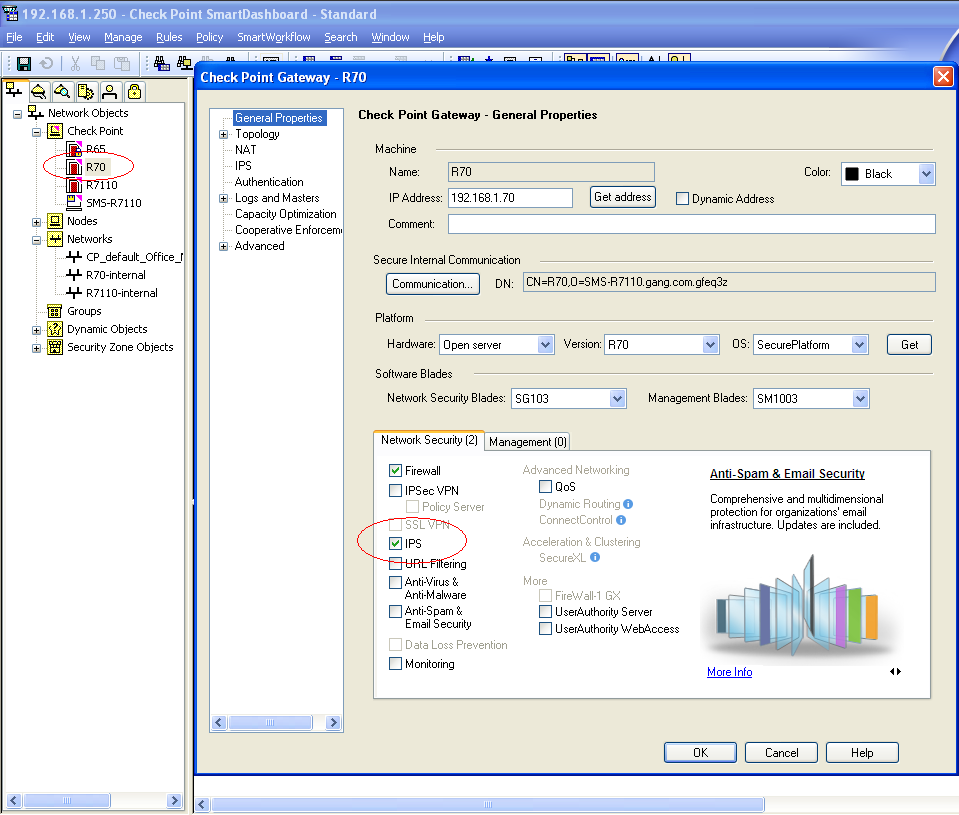
3. In 'General Properties' of Security Gateway check the box 'IPS' to activate this blade.
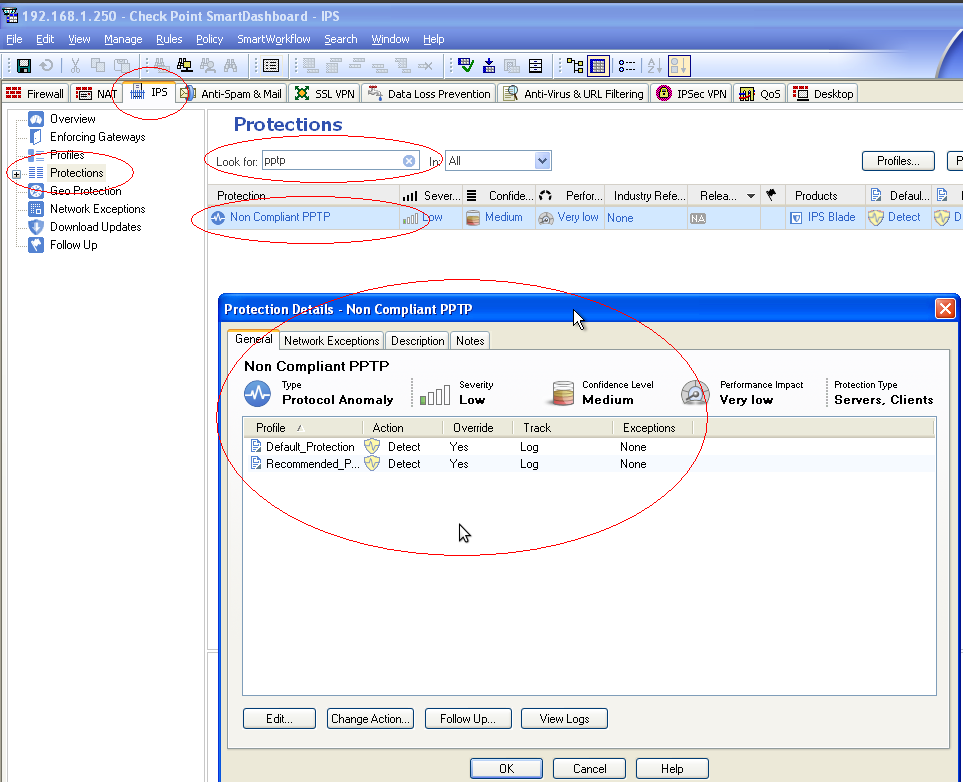
4. On the IPS tab, select 'Protections' on the left pane, search for 'PPTP' in the 'Look for' field on the right pane and open "Non Compliant PPTP" protection for editing
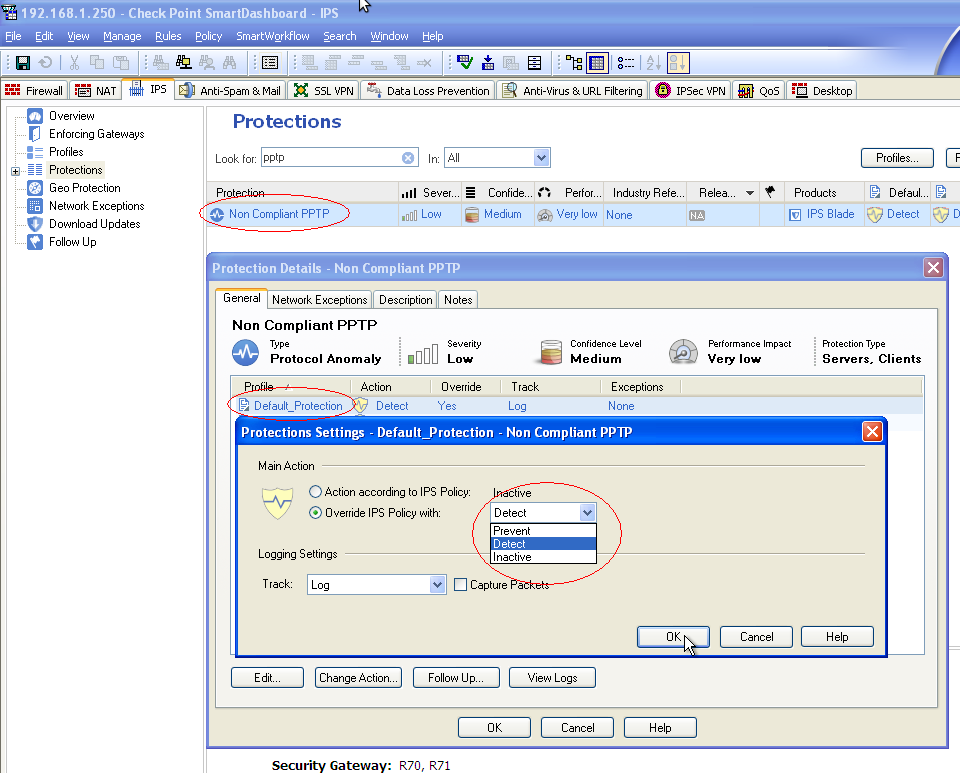
5. Double click the relevant IPS Profile, change the 'Main Action' from 'Inactive' to 'Detected' and click OK
6. Install the Security policy onto Security Gateway and verify PPTP connection.
6. Install the Security policy onto Security Gateway and verify PPTP connection.
Limitation:
To allow the PPTP traffic to pass, Security Gateway must have the IPS software blade enabled in its General Properties page. IPS Software blade requires a separate license to be installed on Security Gateway.
Checkpoint.com
Subscribe to:
Posts (Atom)