There are many ways to monitor devices: netflow, span port, switchport and so on. Today I will explain how to monitor bandwith, CPU, … of routers and switches using SNMP and Cacti.
Simple Network Management Protocol (SNMP) is an “Internet-standard protocol for managing devices on IP networks. Devices that typically support SNMP include routers, switches, servers, workstations, printers, modem racks, and more.” It is used mostly in network management systems to monitor network-attached devices for conditions that warrant administrative attention. SNMP is a component of the Internet Protocol Suite as defined by the Internet Engineering Task Force (IETF). It consists of a set of standards for network management, including an application layer protocol, a database schema, and a set of data objects.
Cacti is a complete network graphing solution designed to harness the power of RRDTool’s data storage and graphing functionality. Cacti provides a fast poller, advanced graph templating, multiple data acquisition methods, and user management features out of the box. All of this is wrapped in an intuitive, easy to use interface that makes sense for LAN-sized installations up to complex networks with hundreds of devices.
Step #1: Configure your snmp device
snmp-server community c1sc0zine RW Step #2: Create your tree
Go to “Management” then “Graph Trees” and click on “Add” link. Compile the “Name” field and click the “Create” button.
Step #3: Add your device
Go to “Management” then “Devices” and click on “Add” link. Compile the “Description”, “Hostname” and “SNMP Community” fields, select the “Cisco Router” Host Template, then click the “Create” button.
Step #4: Create your graph
Click on “Create Graphs for this Host”, select what you want monitor and click on “Create” button. In this tutorial I have decided to monitor Fastethernet0/0, Fastethernet0/1, Dialer1 and CPU.
Step #5: Move your device to your tree
Go to “Management”, “Devices”, select the device with the checkbox and as “Choose an action” select “Place on a tree” and click on the button.
Step #6: View your graph Plugins that could be useful are (http://docs.cacti.net/plugin:monitor)
- thold: alerting of data found within any graph
- monitor: displays the host’s status by using small icons. Green for up, Red for down, and Blue for recovering
- realtime: a method to view Cacti graphs with a resolution of upto 5 seconds.
- weathermap: a network visualisation tool, to take data you already have and show you an overview of your network in map form.
SNMP (Simple Network Management Protocol) is a protocol for managing networks. Each managed entity in the network will run an snmp server (snmpd) which is going to collect datas from the server such as networking, load, cpu ...
Cacti on the other hand is a frontend to the RRDTool with SNMP support. It collects and keep data in a MySQL database and display them through a PHP web frontend.
This tutorial will show how to configure the network manager to use Cacti and how to set up snmp on the managed host.
In this how-to, we are going to run the SNMP server and cacti on the same host and bind the service to localhost. This way, SNMP service won't be accessible from the outside. This is a good configuration when all you want to do is monitoring your home network router for instance. If you intend to deploy this on a network, just keep in mind that SNMP server as to accept connection from the manager network wise (The remote IP need to be able to connect to the server) and within SNMPD configuration (The service as to return collected datas to the manager).
In the first part of this article, we are going to install and configure the SNMP server. A second part will present how to install and configure Cacti on the manager. Finally, we are going to configure Cacti to collect and display CPU, Load, Memory and Network statistic of the SNMP server.
This article was made using Debian Etch and Ubuntu Feisty but should also work out of the box for previous version of those distributions.
1. SNMPD
SNMPD is the service running SNMP on a managed entity. SNMP comes in 3 versions. Version 1, the one we are going to use here is not secured, therefore we are going to make sure that only localhost is going to be able to access it. People opening the service to the outside should make sure that trusted hosts can access the service either though the use of iptables or through the use of /etc/hosts.allow.
1.1. Installing the SNMP server
The only package which is required on the server site is snmpd, the SNMP daemon.
To install it type:
$ sudo apt-get install snmpd
snmpd is now installed but we still have to tweak it a little bit to make it work as we want.
1.2. Configuring SNMPD
The first thing we want to make sure is that snmpd is only going to wait for connections on localhost. To do this, edit file /etc/default/snmpd and make sure those values are set:
If you want your server to listen on all interfaces, remove the 127.0.0.1 bit.
This setting will make sure that the service will be started and that the service is going to bind to localhost.
Finally, we are going to configure snmpd in such a way that it will only return datas to trusted host for a specific community.
Edit /etc/snmp/snmpd.conf and make sure that com2sec it only set to:
com2sec readonly localhost mycommunity
If you want a remote machine to be able to gather information for the community mycommunity, make sure you replace localhost by mynetwork, where mynetwork can be of the form: 1.1.1.1 or 1.1.0.0/16.
1.3. Checking SNMP configuration:
We are going to use the snmpwalk utility to verify that the server is working as wanted.
Here we want snmp to reply only to localhost for the community mycommunity.
From localhost
$ snmpwalk -Os -c mycommunity -v 1 localhost system
Should return a lot of output and:
snmpwalk -Os -c public -v 1 localhost system Timeout: No Response from localhost
If the second command returns result, it might be because you did not comment the line starting with com2sec.
How-To: Monitor your servers with SNMP and Cacti -- page 2
Now that we have our snmp server up and running, we are going to install cacti to manage the snmp server in our network.
2. Installing Cacti
Cacti displays system statistics through a PHP/MySQL web interface.
To gather informations, it runs a script which is going to poll the servers you registered in cacti: /usr/share/cacti/site/poller.php.
So, let's get started an install cacti.
Note: because I am using php5, I had to install all the required php5-xx packages before I installed cacti. If you don't install those first, cacti will fall back to apache2 with php4.
While installing cacti, you are going to be asked a few question, answer as follow:
configuring libphp-adodb -> press ok configuring cacti configure database for cacti with dbconfig-common -> press yes password of your database's administrative user -> mysql root password (empty by default, fill accordingly) mysql application password for cacti -> give the password you would like cacti to connect to mysql with webserver type -> Apache2
Now, cacti is installed, let's configure it:
2.2. Configuring Cacti
Now, cacti is installed as well as its database. We still need through a few configuration screens before we can start adding servers to monitor.
Let's go to http://your-manager-server.ip/cacti/
Click next to the first screen
Select new install and check that the found informations are correct
Check that everything is [FOUND]
Click Finish
Finally, you should be landing on the login page. Log in with username: admin and password: admin. The next screen will force you to change your password.
On the first login, the default account is admin with password admin
Voila, our manager is up and running, the last step is to create new Devices (adding new hosts to our manager).
How-To: Monitor your servers with SNMP and Cacti -- page 3
3. Adding new devices to cactiA device can be anything which is SNMP enabled. It could be a router, a switch....
In our example, we are going to add the server we configured in the first part of this tutorial. The server is on localhost, but it could be anywhere on a network, as long as our manager host is allowed to connect to its SNMP port.
3.1. Creating a new device
To create a new device, first make sure you are in the "Console", if not, click on the "Console" tab on the top left and click on Create devices for network. This will bring you to a new page where you are going to give details about the SNMP host.
Fill up the form and make sure you have the following value properly set:
Hostname to localhost or whichever url/address your SNMP server can be found at
Host Template to ucd/net SNMP Host
SNMP Community to mycommunity or whatever your community is called
SNMP Version to Version 1
SNMP Port default is 161 which should be fine for 99% settings. Change accordingly to your SNMP server settings
Then Click create and you should get to a page where you get something similar to:
MySNMPServer (snmp.server.ip) SNMP Information System: Linux hostname kernel-version #2 SMP Sun Apr 15 07:36:31 UTC 2007 i686 Uptime: 980871 (0 days, 2 hours, 43 minutes) Hostname: hostname Location: Unknown (configure /etc/snmp/snmpd.local.conf) Contact: Root root@localhost (configure /etc/snmp/snmpd.local.conf)
and not like:
SNMP Information SNMP error
If you get the latest output, this means that the connection between the manager and the SNMP host could not be established, either firewalled or refused by the host. Use snmpwalk -Os -c mycommunity -v 1 snmp.server.ip system to troubleshoot.
3.2. Creating a new Graph for a device
OK, sweet, we have enabled our first host to be monitored by cacti. Now, let's add a few graphs.
Click the "Create Graphs for this Host" and check the boxes you want to monitor (CPU Usage, Load Average, Memory Usage).
Under "Data Query [SNMP - Interface Statistics]", check the interfaces you want to monitor and finaly in "Select a graph type" choose the kind of stats you want. I chose "In/Out Bytes with Total Bandwidth".
Validate, and that's it, you will start monitoring some componenets of your device. Now, lets organize our graph tree.
3.3. Creating a Graph Tree
Cacti graphs are organied in a tree. Each host could be a branch of that tree. We are now going to create a branch for our device.
Create a graph tree by going to the left menu and click on "Graph Tree" and "add" on the right side of the new page.
Enter a name to describe your device and click create.
Add a "Tree Item" and select:
Parent Item [root] Tree Item Type Host Host yourhost Graph Grouping Style Graph Template
And create!
Here we are!!! Now click on the "Graph" tab and select your host from the tree.
Voila! Mind that you will need some times before you can see datas.
4. Conclusion
Once you have been able to set up a first host to work with cacti, it is fairly easy to add other host from your network. Simply cnfigure the snmp server in such a way that the machine hosting cacti will be able to contact them.
In this tutorial, the security was preserved by binding the service to localhost and changing the default community name from public to mycommunity. If you start deploying SNMP over the network, I would recommend that you only accept traffic to port 161 (default SNMP port) to trusted host. Iptbables will become of great help.
Netflow là tính năng của Cisco IOS cho phép thống kê lưu lượng gói qua router. Netflow thực hiện giám sát, phân tích, tính toán lưu lượng gói. Sử dụng phổ biến trong các yêu cầu sau:
• Giám sát mạng : Cho phép giám sát hiện trạng mạng gần như thời gian thực. Giám sát mạng là kỹ thuật dựa vào flow (tập những gói có cùng 7 thông tin : IP nguồn, IP đích, Port nguồn, Port đích, ToS, loại giao thức lớp 3, cổng vào) nhằm thực hiện thu thập thông tin theo lưu lượng gói, theo luồng liên quan đến một thiết bị router, switch hoặc sự kết hợp của nhiều lưu lượng từ nhiều thiết bị giúp chủ động nhận diện được vấn đề, hiệu quả trong quá trình xử lý sự cố và đưa ra giải pháp giải quyết vấn đề một cách nhanh chóng.
• Giám sát ứng dụng : Cho phép người quản trị nhìn thấy một cách chi tiết về hoạt động của ứng dụng trên mạng theo thời gian. Thông tin này được dung để hiểu được những dịch vụ mới nhằm phân phối tài nguyên mạng (băng thông, chất lượng dịch vụ…) và tài nguyên cho ứng dụng cũng như là kế hoạch mở rộng.
• Giám sát người dung: Cho phép người vận hành mạng hiểu rõ tài nguyên mạng và tài nguyên ứng dụng mà người dung sử dụng từ đó có kế hoạch phân phối tài nguyên một cách hợp lý cho người dung, cũng như nhận diện được những vấn đề liên quan đến an ninh mạng hoặc vi phạm chính sách.
• Xây dựng kế hoạch phát triển mạng : Do có khả năng giám sát và phân tích lưu lượng dữ liệu trong một khoảng thời gian dài, điều này cho phép người quản trị có cơ hội theo dõi, dự đoán sự phát triển của mạng để có kế hoạch nâng cấp như tăng số lượng router, những cổng với băng thông lớn…
• Phân tích an ninh mạng : Netflow định danh và phân loại những loại tấn công như Dos, DDos, virus, worm theo thời gian thực dựa vào những sự hành vi thay đổi bất thường trong mạng.
• Tính toán lưu lượng: Netfow cho phép người quản trị có được thông tin chi tiết lưu lượng dữ liệu như địa chỉ IP, ứng dụng, ToS (type of service), số lượng gói, số lượng byte, thời gian hoạt động giúp cho việc tính toán tài nguyên mạng được sử dụng theo người dung, ứng dụng… trong khoảng thời gian cụ thể.
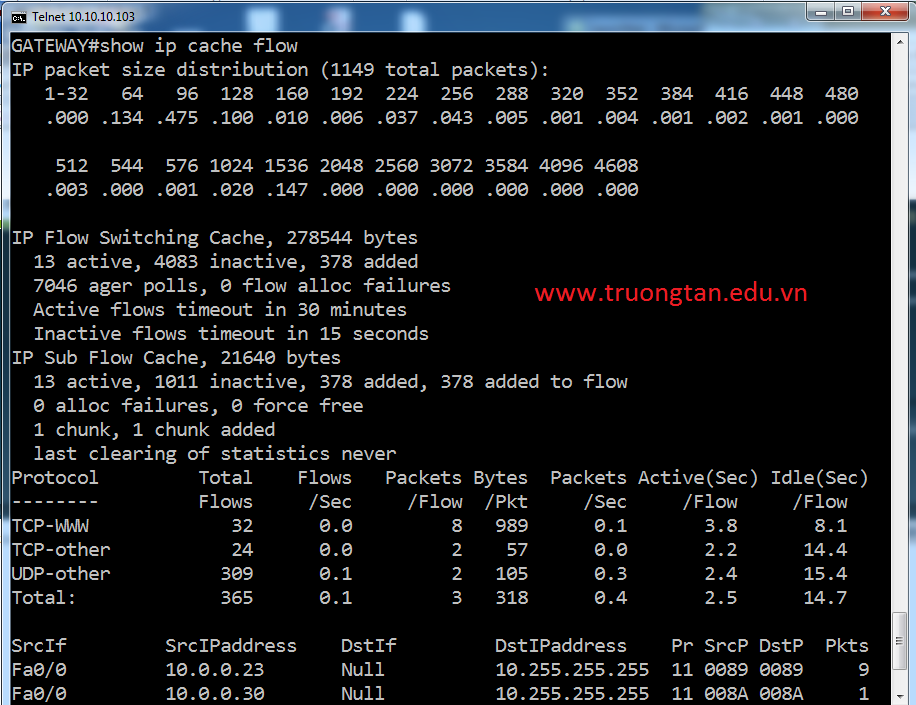
Lưu lượng qua router hoặc switch khi thu thập và phân tích sẽ được đặt trong cache (Netflow cache), có thể truy xuất thông qua CLI hoặc ứng dụng bên ngoài.
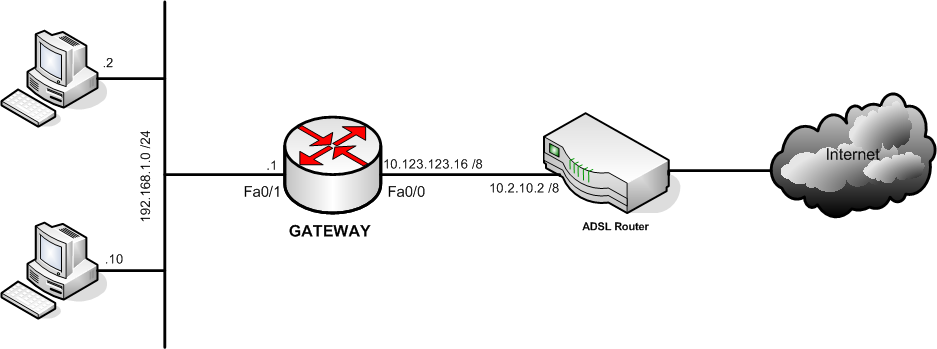
II- Mục đích và sơ đồ kết nối
Trong bài lab này yêu cầu cấu hình Netflow trên router GATEWAY và kiểm tra kết quả Netflow cache qua CLI hoặc ứng dụng phân tích Netflow được cài đặt trên thiết bị giám sát.
III – Cấu hình chi tiết :
Bước 1 : Đặt tên và địa chỉ của các interface
Router(config) #hostname GATEWAY
GATEWAY(config) #interface FastEthernet0/0
GATEWAY(config-if) # ip address 10.123.123.16 255.0.0.0
GATEWAY(config-if) #no shutdown
GATEWAY(config) #interface FastEthernet0/1
GATEWAY(config-if) # ip address 192.168.1.1 255.255.255.0
GATEWAY(config-if) #no shutdown
Bước 2 : Cấu hình PAT và default route để mạng bên trong truy cập được Internet
- Bạn có thể cấu hình snmp-server để cho phép đa dạng thông tin được theo dõi :
GATEWAY(config)# snmp-server community cisco123 RO
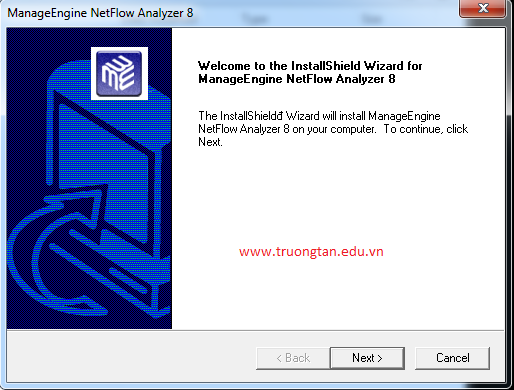
Bước 4 : Cài đặt Netflow trên phần mềm giám sát
Trong phần này chúng ta sẽ dùng phần mềm Netflow Analyzer 8 để thực hiện giám sát
- Chuẩn bị cài đặt:
Chọn Next để tiếp tục
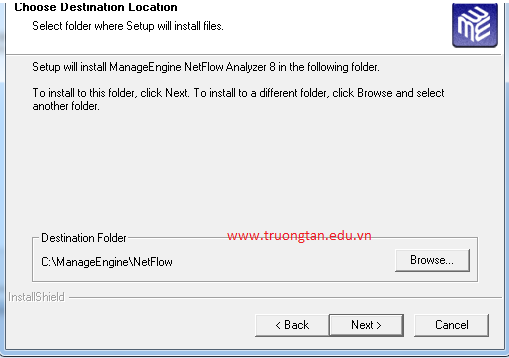
- Chọn thư mục cài đặt:
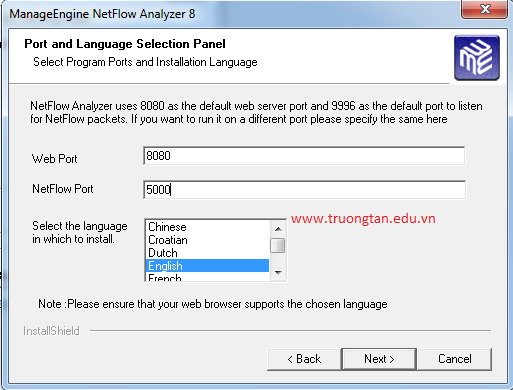
- Cấu hình web port 8080 và Netflow Port ở đây là 5000
Chọn Next -> Finish
Kiểm tra:
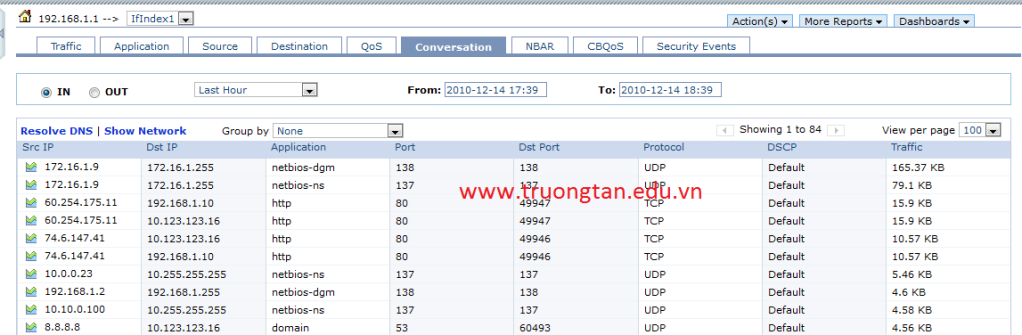
Thực hiện truy cập dịch vụ Internet từ PC, ta có thể phân tích lưu lượng của ứng dụng theo kích cỡ gói, số lượng gói, địa chỉ IP, số port, cổng vào, cổng ra… trên router bằng câu lệnh show ip cache flow
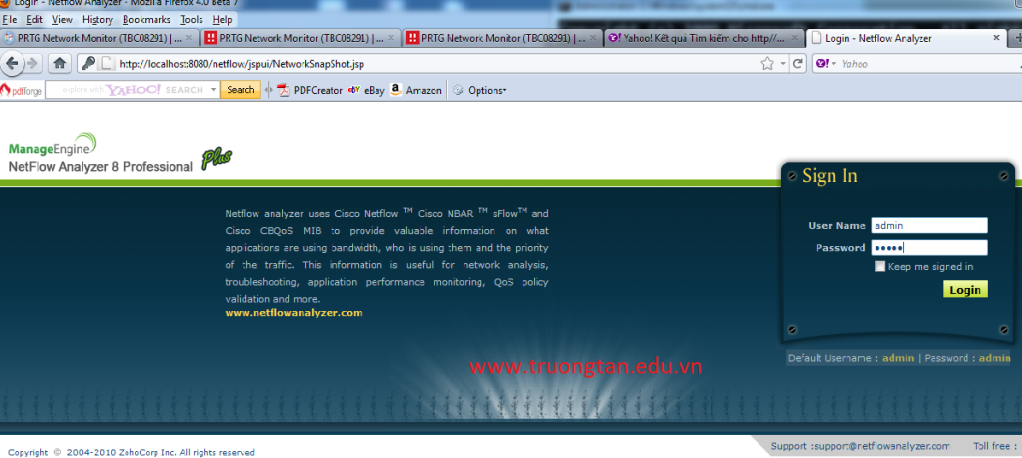
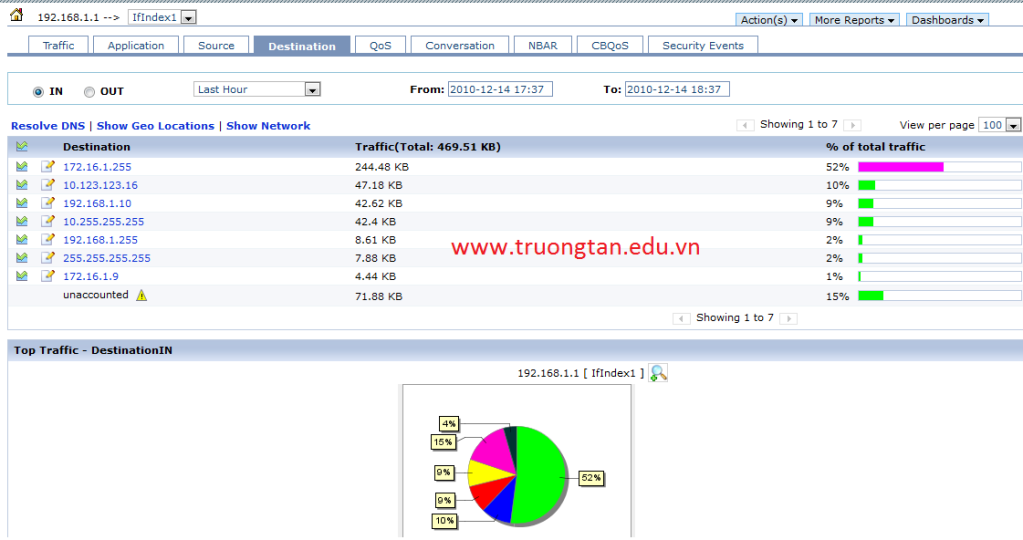
Bạn có thể quan sát trực quan bằng công cụ phân tích netflow dựa trên giao diện Web. Thực hiện đăng nhập vào ứng dụng với User Name :admin, Password : admin
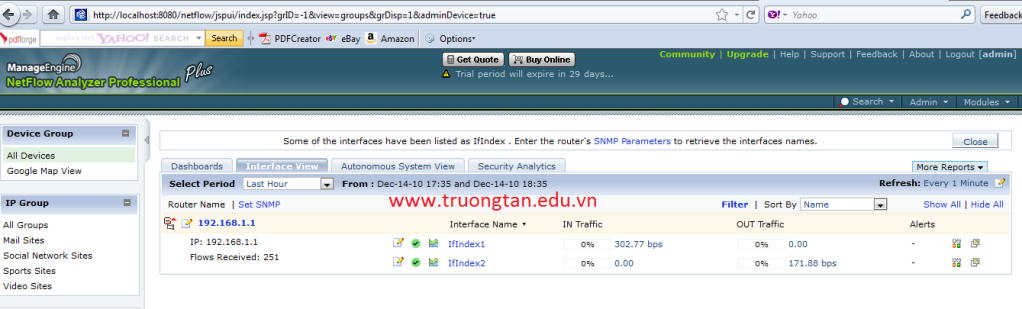
Sau khi đăng nhập thành công, bạn sẽ thấy các thiết bị được theo dõi:
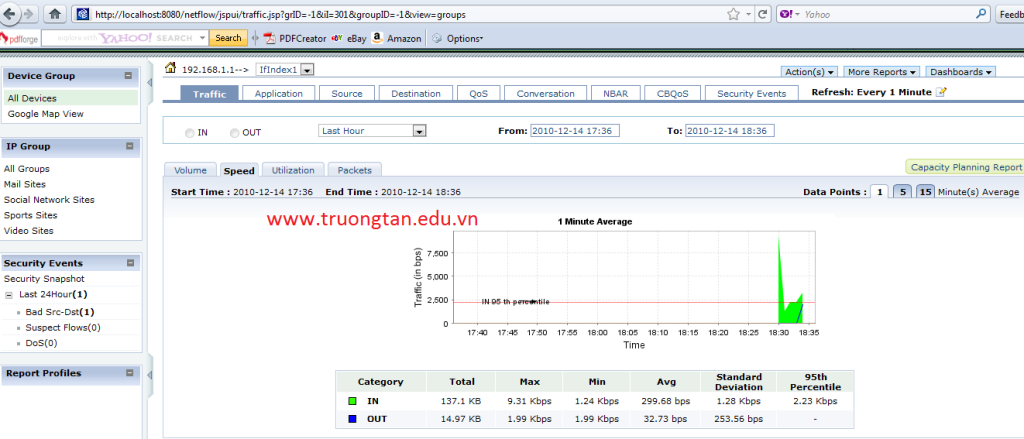
Biểu đồ biểu hiện lưu lượng theo thời gian và bảng thể hiện lưu lượng theo ứng dụng
Phân loại lưu lượng theo địa chỉ IP nguồn và IP đích
you have got a rar file (or other file formats not naively supported by Ubuntu’s archive manager- such as arj, 7zip, etc), you need to install extra packages so that Archive Manager can handle these file formats. For example, if you would like to unrar a file in Ubuntu, you need to install the package unrar. Open a terminal (command window) and simply issue this command:
sudo apt-get install unrar-free
for a non-free option, you can use:
sudo apt-get install unrar
You might be asked to give your password and then the package is downloaded and installed. After the package is installed, you can use the usual Archive Manager to unrar files.
If you have previously worked on ASP.NET MVC 2 projects and are making the move to MVC 3 you may have noticed that deploying projects to a server environment that doesn't have MVC installed is not as easy as it once was. Prior to MVC 3 we could simply set the "Copy Local" property to "True" on a couple of references that were already part of our project. With MVC 3 (and the Razor view engine) there are a set of dependencies that are not part of the default project setup and aren't required as a direct reference within the project. The full list of the required dependencies is:
Microsoft.Web.Infrastructure
System.Web.Helpers
System.Web.Mvc
System.Web.Razor
System.Web.WebPages
System.Web.WebPages.Deployment
System.Web.WebPages.Razor
Thankfully, Visual Studio 2010 Service Pack 1 provides an easy way to get these dependencies into your project without adding them as references and make them part of the bin dir on build.
Here is a look at our project structure (an MVC 3 web site) prior to adding the required dependencies:
If we bring up the context menu (right click) on our Website project we will see the option for Add Deployable Dependencies...
Click on that and we will get a dialog window with the option to select which MVC dependencies we want to include. Check both only the ASP.NET MVC dependency (see Phil Haack's comment down below for an explanation) and click OK.
And the results:
Holy cow that is a lot of files! A dir named _bin_deployableAssemblies gets added to the project with all the required dependency files. Visual Studio 2010 with Service Pack 1 will know to hit the dir with this name to add any required dependencies to the bin dir on build. That's it. Cake! Now we can go about our normal deployment business. If we use Web Deploy, well, everything is in our bin dir on the build action and the Web Deploy will deploy the bin dir so we are all set. If we have some other process to deploy, as long as we are including the full contents of the bin build dir then we are covered as well.
Ever feel like the HTML element just didn't get enough lovin' in ASP.NET MVC? The HtmlHelper.DropDownList helper is a definite plus, but mapping data to it from a view model tends to be a bit too ridged as it depends upon a MVC specific class, System.Web.Mvc.SelectList. No worries, the great thing about programming is that we can take it upon ourselves to craft solutions that fit our needs. Let's take a look at how we can handle extending the DropDownListhelper and make it easier to work with data in a view model to populate our HTML elements.
The current overload methods for System.Web.Mvc.HtmlHelper.DropDownList:
We can see that all the methods that provide a means for populating the elements work off of an IEnumerable object. The sticker here is the SelectListItem type. In order to pass data into the helper we need to package it up in SelectListItem objects. So our code that handles prepping data for the view will need to know about an MVC specific construct. Not that there is necessarily anything wrong with that, but it can be limiting to your decoupling efforts if you are into that sort of thing (which can be a very good thing to be into).
We can work around this by writing our own extension methods on the HtmlHelper class. Let's begin by writing an extension method in a static class forHtmlHelper.DropDownList. This extension method will allow us to pass in a string to represent the name to use for the HTML select element and a Dictionary collection object for the HTML option elements. The method will handle mapping the dictionary to a System.Web.Mvc.SelectList object that can then be passed to one of the existing DropDownList methods.
The SelectList constructor supports passing in an IEnumerable object and two strings that represent the property names of the value field and text field to use from the objects in the enumerable collection. This makes it easy for us to pass in the incoming dictionary object and the name of the properties on the objects in the dictionary. Enumerating over a Dictionary object results in KeyValuePair objects that have properties named Key and Value, so those are the string values we would use to tell the SelectList object how to map the data. With the SelectList created, we can call the existing DropDownList method on theHtmlHelper and be on our way.
With the extension method in place we can turn our attention to crafting a view model and loading up data for populating a select list. Imagine we needed a select list for days of the week where the text is the name of the day and the value is an integer representing the day number in the week. If we were to create a class namedPageWithSelectList as our view model, we could fill it out with the following:
The DaysOfWeek would represent the data for the option elements. The DayOfWeek would represent the selected day key value (if any). The constructor handles loading up the DaysOfWeek with some data.
Moving to the controller, we can initialize an instance of the PageWithSelectList class and pass that to a view. Using a HomeController as an example, the Indexaction method could look like so:
usingSystem.Web.Mvc;usingWebsite.Models;namespaceWebsite.Controllers{publicclassHomeController:Controller{publicActionResultIndex(){var model =newPageWithSelectList();returnView(model);}}}
Before we turn our attention to the view file we need to address some details in the way the Razor view engine works. In previous versions of MVC you were able to add namespaces to the pages node in your main Web.config file to make them available to your view files without needing to add using statements within your views. With the Razor view engine there is a new node where these need to go () and they need to go into the Web.config file located in theViews directory.
With the default MVC 3 projects in Visual Studio 2010 this node will automatically be added to the Web.config files in the Views directories. In the example above we have added the Website.Models namespace to the list so our views will have access to it and thus be able to call our extension method.
Note
If you use Areas you will need to add namespace nodes to each Web.config in each Areas//Views directory if you want them available. Right now it doesn't look like adding the node to the top level Web.config is supported.
With those minor details handled we can build our view content. We make the view strongly typed to our Website.Models.PageWithSelectList class and add a call to our new extension method, passing in the name of our DayOfWeek property to align the html element id with our view model field and the DaysOfWeek object from our view model for populating the select options.
Since we added the Website.Models namespace to the Web.config file in the Views directory we do not need to use the namespace in our @model declaration, nor do we need to include a @using declaration. However, if we didn't add the namespace to the Web.config our view would look like:
With that, we have added some decoupling love to the HtmlHelper.DropDownList method! But the "out of the box" helper is not completely without love. In fact, it is tricked out to make our life extremely easy when it comes to pre-selecting an option in our view. Since our extension method is handling the mapping of our data structure into a structure the existing HtmlHelper.DropDownList method supports we get all the benefits of the existing method. The method will look for an existing property in the view model that matches the name value passed into the DropDownList method and will set the Selected property on the SelectListItem that has a matching value. By adding the DayOfWeek property to our PageWithSelectList view model we can set that property in our HomeController.Index action method and the HtmlHelper.DropDownList method will take care of things from there prior to rendering the html.
Setting the property on our model in the action method:
usingSystem.Web.Mvc;usingWebsite.Models;namespaceWebsite.Controllers{publicclassHomeController:Controller{publicActionResultIndex(){var model =newPageWithSelectList();
model.DayOfWeek=3;returnView(model);}}}
With no changes needed to our view, the resulting html that gets rendered:
Maybe a Dictionary is not ideal for what your application needs. No problem. Simply create extension methods that take in data structures that you need. If they implement IEnumerable you can use the same example code logic we have already set up. If they don't, just handle mapping your data structure manually in your extension method logic.
Don't like the notion of working with "magic strings"? Create an extension method for the HtmlHelper.DropDownListFor method: